NL24
NL24 Lavalier / Neckband 2.4G Wireless Mic System
171.024UK
Introduction
Thank you for choosing the NL24 wireless neckband / lavalier microphone system as part of your sound equipment. This versatile wireless set is designed to provide hands-free voice pickup in a wide range of applications. Please read this manual in full and follow the instructions to gain the best results from your NL24 set.
Warning
- To prevent the risk of fire or electric shock, do not expose any of the components to rain or moisture.
- If liquids are spilled on any component, stop using immediately, allow unit to dry out and have checked by qualified personnel before further use.
- Avoid impact or heavy vibration to any of the components.
- No user serviceable parts inside transmitter or receiver
- Refer servicing to qualified service personnel.
Safety
- For charging the transmitter or receiver, please use a safety-certified USB charger capable of 2A or higher.
- Please be aware that the NL24 comprises small parts and could present a choking hazard if swallowed.
Placement
- Keep the unit away from moisture or dusty environments.
- Do not place heavy objects on top of the unit
- Best wireless range is achieved when transmitter and receiver are within line of sight of each other.
Cleaning
- Use a soft cloth with a neutral detergent to clean the housing as required.
- A soft brush can be used to clear debris from the unit without damaging it
- Do not use solvents for cleaning the microphone or receiver
Controls and features
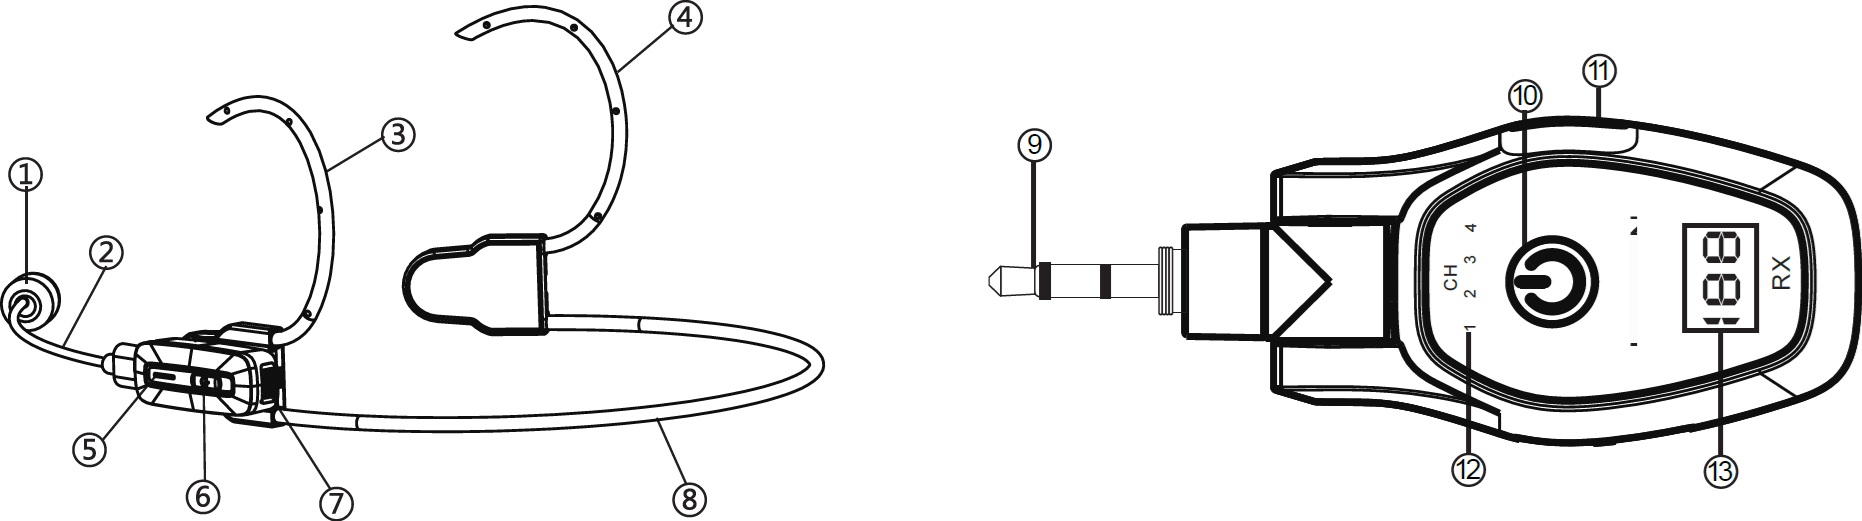
- Boom microphone capsule
- Microphone boom arm & USB-C connector
- Left earhook
- Right earhook
- Transmitter LED indicator
- Transmitter power button
- Transmitter inbuilt microphone
- Neckband
- 3.5mm receiver output plug
- Receiver power button
- Receiver USB-C charging port
- Receiver channel indicators
- Receiver charge display
Power requirements
- Power supply: Internal Li-ion batteries.
- Use a 5Vdc USB charger with over 2A output to recharge.
- Battery type: Li-ion rechargeable 3.7V - 120mA (Tx) 400mA (Rx)
- Battery life: 6 hours max. (Tx), 15 hours max (Rx)
- Ensure both transmitter and receiver are fully charged before use.
Installation and setup
Unpack the unit and verify all supplied components are present. Transmitter (Tx) Receiver (Rx) Neckband assembly Type-C boom microphone Magnetic button Magnetic clip Split USB-C charging cable 3.5mm to 6.3mm output plug adaptor
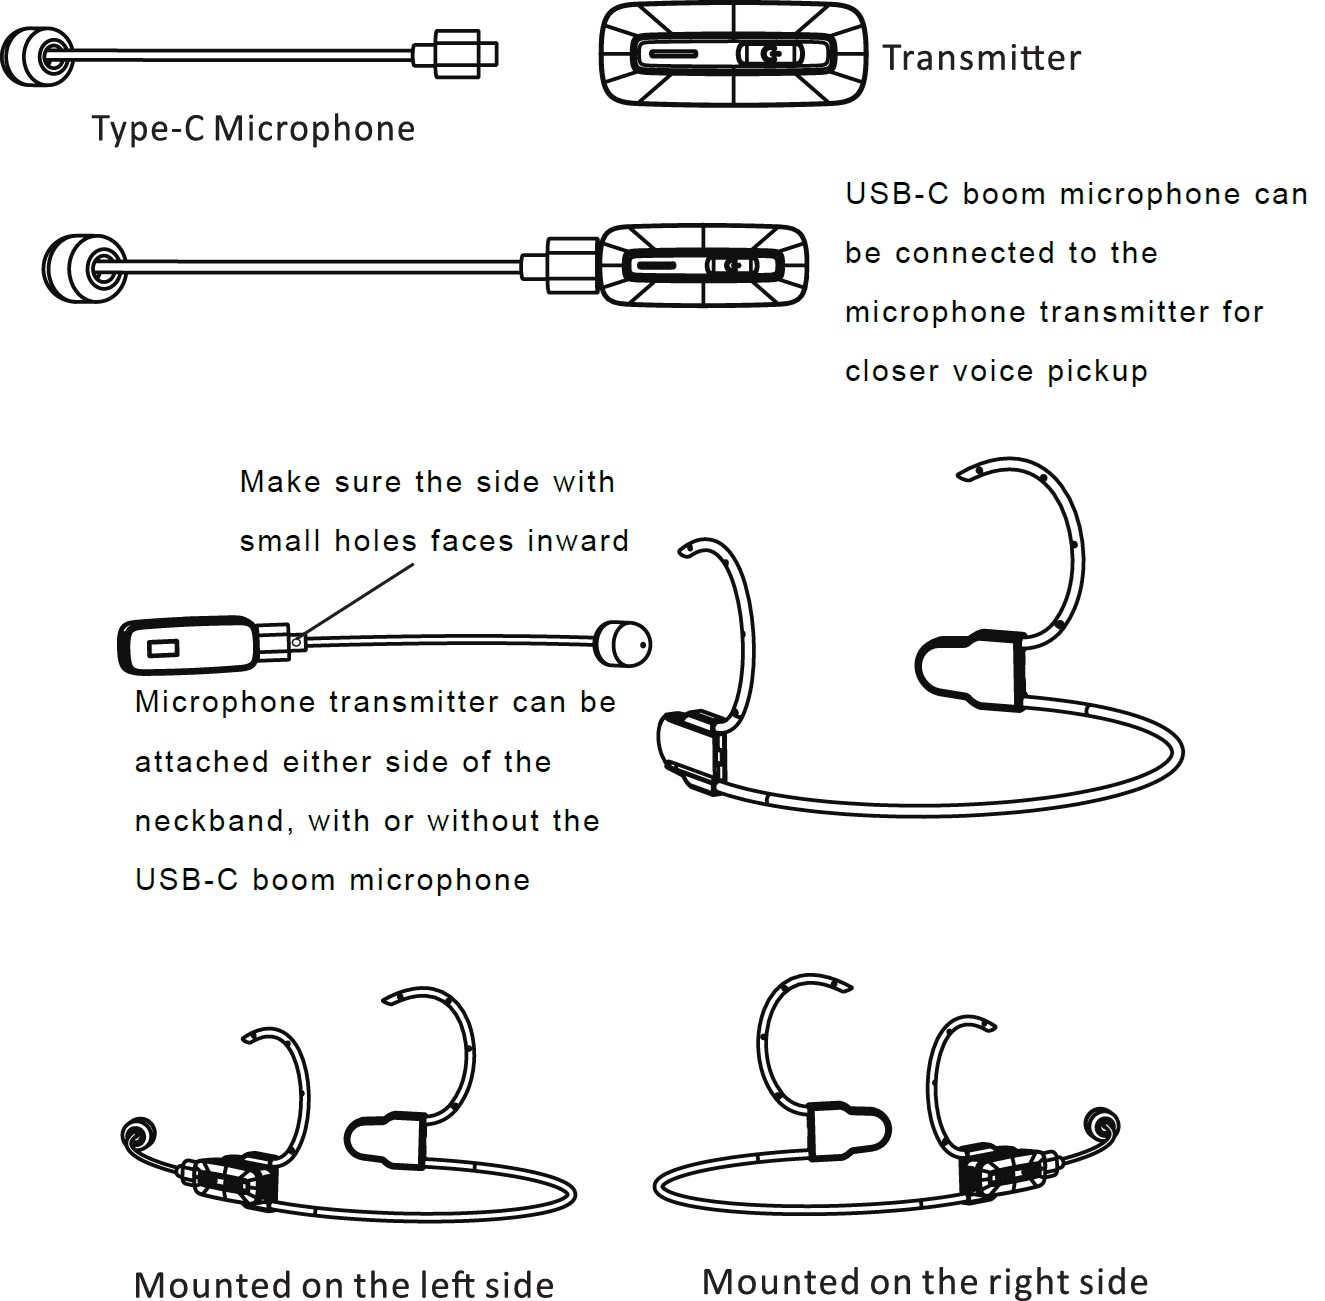
The transmitter has an inbuilt microphone, which can be attached to clothing using either the magnetic button or clip for use facing upwards as a lavalier microphone.
THe transmitter can also be magnetically attached either side of the supplied neckband assembly for use as a neckband mic (with or without a boom microphone)
For more directed voice pickup, the USB-C boom microphone may be attached and used as a handheld wand microphone or on the neckband assembly as a headset microphone. The transmitter attaches to the neckband on either left or right side magnetically. When the boom mic is used, ensure the pin-hole on the USB-C connector is facing the user.
See below for assembly guidance.
Connections
Plug the receiver into a 6.3mm mic or line input on the mixer or other input device. Alternatively, removing the adaptor reveals a 3.5mm plug for connection to this size of socket. Ensure the output level is turned down to avoid loud noises when powering up.
Operation
Press and hold the transmitter power button for 3 seconds and it will power up. Press and hold the receiver power button for 3 seconds and it will also power up. Both units will pair if they are in close range. See below for pairing procedure.
Basic operation
Gradually turn up the output level on the mixer or other connected device and speak into the microphone until the voice is heard through the sound system, then increase to the required volume level.
The NL24 system operates on the license-free 2.4GHz carrier band and there are 4 channels selectable.
The receiver has 4 backlit numbers to show which channel is active. If the backlight is steady, the transmitter is paired with the receiver. If the backlight is flashing, it is in pairing mode with no transmitter linked.
The transmitter has a single LED that changes colour to indicate which channel is being used, or flashes when trying to pair.
A short press of the receiver's power button switches between channels.
To power transmitter and receiver down, press and hold the power button on each. It is advised to turn down the output level on connected equipment to avoid loud noises during power-off.
Maintenance
- No regular maintenance is required.
- To clean any of the components, use a dry cloth and avoid any ingress into the microphone parts.
Troubleshooting
If the unit does not operate as expected, consult the table below before contacting technical support. Many common issues can be resolved by checking connections, power sources, or settings.
Before proceeding
- Ensure the unit is set up and operated according to this manual.
- Verify that all connections are secure.
- Restore the unit to its default or minimum configuration, if applicable, before troubleshooting.
Before any maintenance
- Switch off the unit and disconnect it from the USB charger.
- Ensure the components are dry
- Do not remove covers or attempt internal repairs.
Common issues
The following table lists common issues and corrective actions that do not require opening the unit.
| Issue | Solution |
|---|---|
| No output | Check output level of connected equipment |
| No output | Check physical jack connection, including adaptor |
| No output | Check USB-C boom mic connection |
| Poor boom mic pickup | Ensure pin-hole on USB-C plug is facing towards the user |
| Not pairing | Try alternative channel |
| Not pairing | Check for interference from nearby WiFi equipment| |
| Not pairing | Ensure Tx and Rx are within wireless range |
Disposal and recycling
Dispose of this product in accordance with local environmental regulations. Do not dispose of electronic equipment with household waste.
Compliance
This product complies with applicable safety and EMC standards.
Specification
| Specification | Value |
|---|---|
| Power supply | Internal battery Tx: 3.7V 120mA, Rx: 3.7V 400mA |
| Microphone : connector | USB-C (directional boom microphone) |
| Charging voltage | 5Vdc USB-C |
| Carrier frequency | 2.4GHz band |
| Range | Up to 30m |
| Operating time | 6 hours max. (Tx), 15 hours max. (Rx) |
| Polar pattern | Omnidirectional (lavalier), cardioid (boom) |
| Charge time | 1.5 hours (Tx), 2 hours (Rx) |
| Dimensions : microphone | 140 x 12 x 6mm |
| Weight : microphone | 6g |
| Dimensions : transmitter | 43 x 20 x 14mm |
| Weight : transmitter | 15g |
| Dimensions : receiver | 68 x 38 x 33mm |
| Weight : transmitter | 36g |
Precautions
Indoor use only : The "House" symbol identifes electrical equipment designed primarily for indoor use.
Disposal : The "Crossed Wheelie Bin" symbol on the product means that the product is classed as Electrical or Electronic equipment and should not be disposed with other household or commercial waste at the end of its useful life. The goods must be disposed of according to your local council guidelines.
AVSL Group Ltd, Unit 2 Bridgewater Park, Taylor Road, Manchester, M41 7JQ, Unitied Kingdom
AVSL (EUROPE) Ltd, Unit 3D North Point House, North Point Business Park, New Mallow Road, Cork, Ireland


